

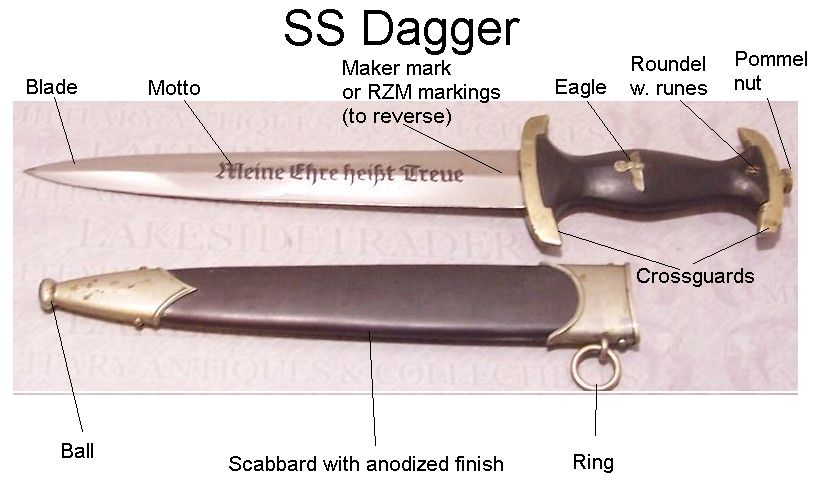
"Meine Ehre heisst Treue"
SS Dagger Basics Sell my SS Dagger

SS dagger collecting is a fascinating hobby however is can be a minefield for the beginner. We at Lakesidetrader believe that a well educated customer is going to keep coming back to us. That is why we spend a lot of time and money educating the collecting community. SS daggers are five times the price of an SA dagger, for this reason fakers have focused their efforts on SS rather than SA's. This article is for the beginner. I am only speaking in generalities here and advanced collectors will have to look elsewhere, however I believe that this hobby has given me so much I would like to give something back in return. Hopefully these pointers can save you a great deal of grief and get you up the learning curve much more quickly. The best advice I can give the beginning collector is to buy their first SS from a trusted source preferably a certified dealer who offers a lifetime warranty as to authenticity and an inspection period just like we do at Lakesidetrader. This is a very small investment in the hobby. The most common mistake I see is a newbie buying his first dagger from an auction site or at a gun show trying to save a few bucks. I don't know how many times I have seen new collectors throw in the towel after getting taken on their first purchase! Newbies often buy from auction sites while experienced collectors buy from dealers. That alone should say something! When holding a known original in your hand many of the things I am going to speak about here will come clear.
MODEL M33
Receiving an SS dagger was a big deal. All members of the SS from Enlisted men through to the highest rank were authorized to carry an SS dagger upon completion of necessary requirements. Candidates were not just handed a dagger. There was a very ritualistic torchlight ceremony in front of the hallowed Nazi shine in front of the Feldhernhalle in Munich on Nov. 9 every year. This emotionally charged ritual took candidates back to their Tetonic roots in the Middle Ages. Candidates pledged their oath to Adolf Hitler and only then were they able to wear an SS dagger. Of course the daggers inscription was meant to be a constant reminder of their oath unto death.

Who made early maker marked SS daggers? Well the list is short so I will share it here with you. The commonly accepted makers of early daggers are as follows in order of frequency found: Eickhorn, Herder, Hammesfahr, Boker, Klaas, and less frequently Pack, Bertram, Klittemann & Moog, Jacobs, Schuttlehofer, Gembruch and Puma. Other maker marked daggers do exist but they are very, very rare and should be approached with extreme caution. More often than not they are not original so save yourself some grief and leave them to seasoned collectors.
BLADE
That's what we collect. EDGED weapons. If the blade is garbage the dagger will never amount to much. First off, look for complete blades. Retipped, sharpened and shortened blades dramatically reduce value and should be avoided. Even nicks and scratches affect value. SS blades are acid etched with the motto, "Meine Ehre heisst Treue" in some rare instances there is a "!" at the end of the motto. I'll address the exclamation point daggers later. The motto's meaning is, "My word is my honor" referring right back to the day the SS members made their oath to Adolf Hitler. Dark mottoes are more desirable than light mottoes. Early maker marked blades and early RZM contract daggers are the most desirable, transitionals (blades having been maker marked and RZM marked) are the second most desirable, and finally, RZM marked blades are the least desirable.
These RZM codes have been a source of confusion with collectors so I will explain the meaning of these codes. There are two kinds of RZM codes on SS daggers. The first types are maker marks. Maker marks designate a code given to individual companies replacing the company's name. These numbers range from RZM M7/1 through RZM M7/119. The prefix "RZM M7/" indicates a company maker mark.
The second type of RZM numbers found on SS daggers is a code that runs from RZM 15 through to 1317. These RZM code refer to a SS contract numbers, not a company. These codes always have two numbers. The first is the contract number and the second the year of manufacture. So RZM 1198/40 translated means RZM contract 1198 and the year 1940. Finally these contracts were issued to companies and in some cases these companies subcontracted the daggers to other suppliers. We have provided a list in our education section where you can see these codes.
CROSSGUARDS
Crossguards fall into 3 categories:
- Solid Nickel
- Plated
- Steel
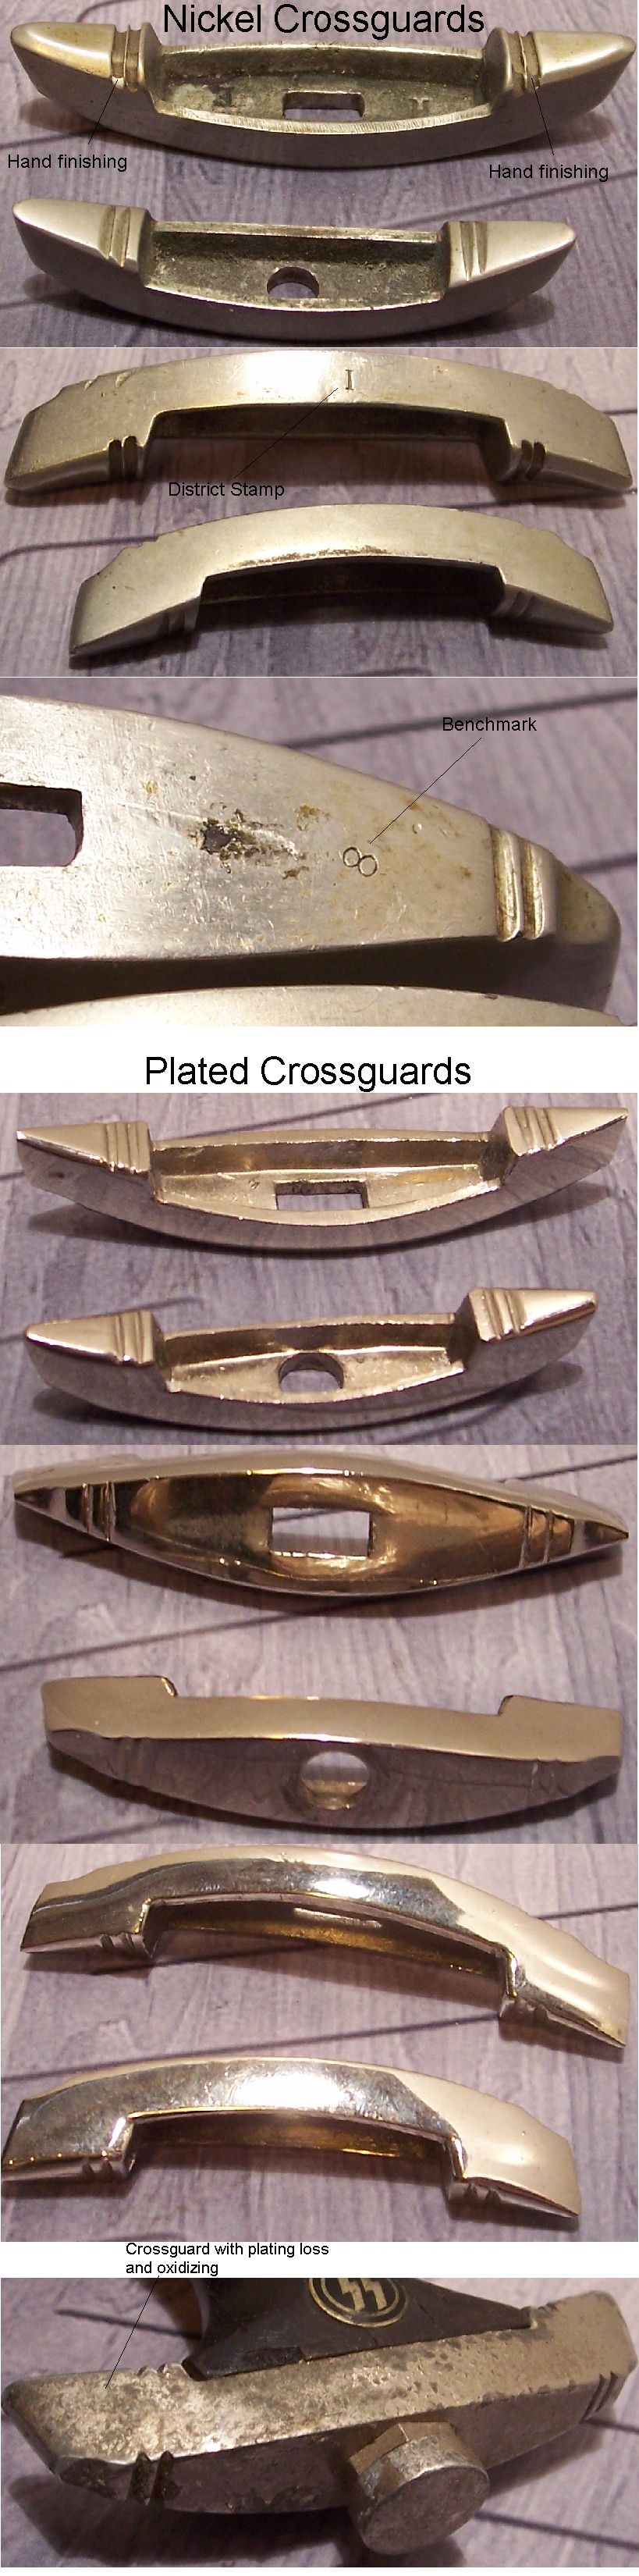
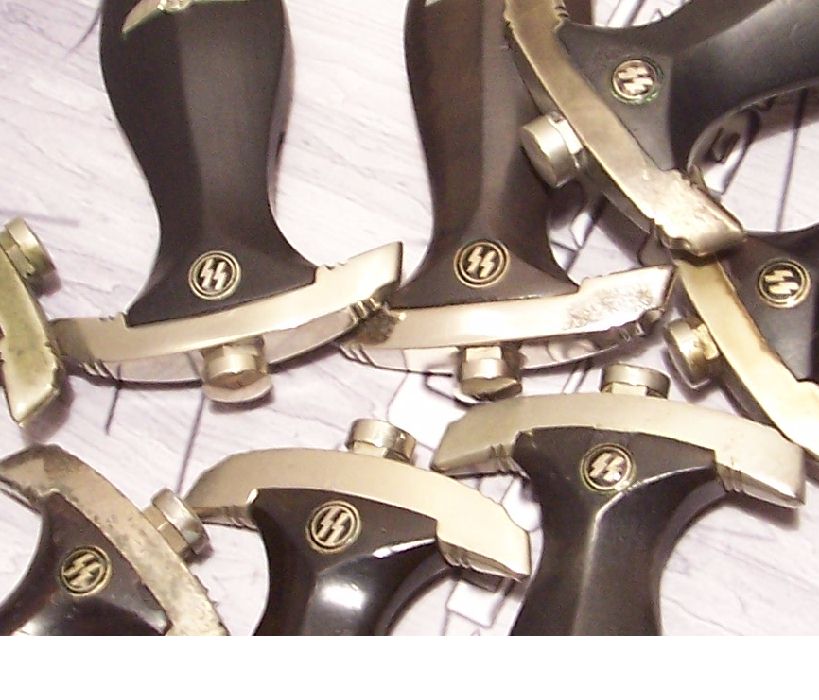
Solid Nickel crossguards are the most desirable. They stand the test of time and never deteriorate. They will dull and develop a patina but will never lose their integrity. They were the first crossguards made and appear dull in finish. Normally for daggers made prior to 1936 they are stamped with a "district mark" mark on the lower crossguard. This mark denoted the original issue location. The district mark is always found on the back of the dagger. This is always a roman numeral. This mark is stamped relatively centrally and normally longitudinally and in some cases sideways. This is a list of the three accepted issue districts for SS daggers; "I" Munich, "II" Dresden, "III" Berlin. Approximately 60% of daggers were issued in Munich, 30% in Berlin and the remains 10% in Dresden. Each crossguard has eight deep grooves sometimes these are darkened and sometimes they are hand finished. Occasionally you will also find these early crossguards stamped on the very bottom (facing the blade) with a small single digit number; this is called a bench number and denotes who originally assembled the dagger or who inspected it. Other markings can be found as well. Serial numbers, unit markings and even names or dedications can be found. These are so numerous that I cannot go into them all here, but more often than not you will see these on the earliest of crossguards. I encourage you not to pay big premiums for these markings, most are just fine and in some cases these have been added by forgers to increase resale value. As a result collectors always view these with suspicion. In the case of high profile original owner's serial numbers or personalization's be even more careful. These photos illustrate examples of crossguards.
Plated crossguards came out later in the production of daggers as industry was forced to economize on materials. They are never district stamped. These guards were made from die cast zinc or pot metal. A thin copper flash was applied, (this allows the final plating to adhere to the base metal) and then a chrome or nickel-plate on top of that. They normally appear shiny but can dull down from nicotine or airborne pollution. The trouble with plating is that it must be done properly or it will, over time, bubble as the metal underneath corrodes. Today's die casters have this down pat, but in the 30's this was still an issue. Many plated fittings now display lifting or corrosion. Lifting can be seen as a paper-thin layer of flexible metal rising up off the casting. Underneath that lifting is corrosion. This plating can be removed by cleaning and buffing the fittings too much. Keep in mind this plating is only a few tenths of a millimeter thick, once it's gone, its' gone. My advice is don't mess with them. Most times these fittings are unmarked on the exterior. These plated crossguards exhibit deterioration that can be seen on plated parts. They are never district stamped.
Steel crossguards were another substitute for the early nickel fittings. These were used later in production and are rarely seen. These guards have the advantage of not having the corrosion or lifting problems of plated fittings. Again they are never district stamped.
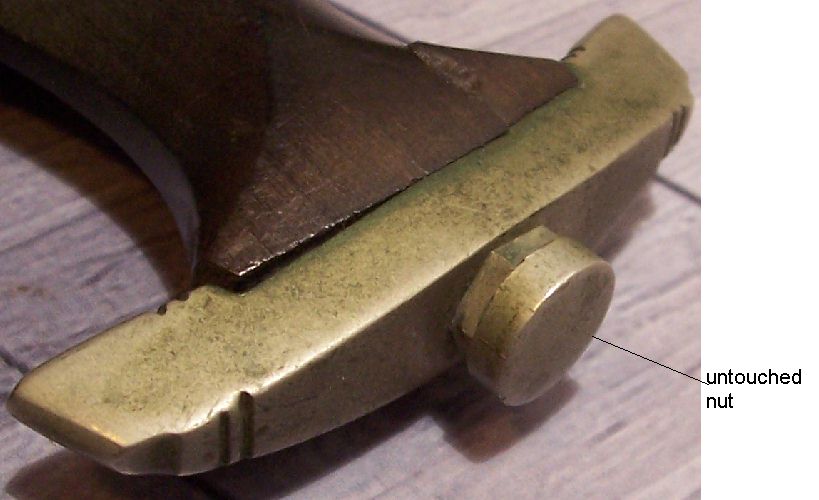
POMMEL NUT
Look to see if the nut shows scratches or signs of wear. This wear is due to people disassembling, and often, without the proper tools. The more an item is disassembled the more chance it has of being messed with and/ or damaged. In time the threads wear and have increased chances of being stripped. A pristine nut that has never been turned is a rarity today and desirable, so if your dagger has never been apart leave it alone. Look for buildup of patina on the nut flats this is a good indicator of an unturned nut. Materials can be only nickel or nickel plated steel. The important thing being that the material remains consistent with the rest of the fittings. Rarely would any dagger leave the factory with mismatched fitting materials, and when you see one it should be viewed with suspicion. As a side bar if you must take your dagger apart, don't over tighten your pommel on reassembly. Wood moves with humidity and temperature. If you do not allow for that movement, eventually the wood will give. These nuts need not be any more than finger tight. Just ask the SS collector who reefed down on his pommel nut in mid-winter only to wake up one humid June morning to see his prize possession chipped. Finally use the right tool. Pliers are not the right tool!
GRIP
SS grips had a ton of work in them and much care went into their production. Each grip went through a final fit process. People today generally do not understand this. Everything you buy today is assembled from parts that are interchangeable. In the 30's daggers were still made by hand each piece being fit by a craftsman. The fit of these things is what it's all about and the grip is where everything comes together. Parts were made on machines but the tweaking done by hand. It never ceases to amaze me when I see people selling parts on auction sites. The poor buyers get this stuff and then wonder why things do not fit together correctly, well now you know. Handles were made from hardwood never softwood. Makers tended towards some generalities so in time one can see characteristics typical to individual makers. They were roughed out, sanded down, stained by boiling the grips in black aniline dye, and then the inserts fit with care. This process of impregnating grips with dye tended to make the grips brittle and susceptible to chipping, flaking and cracks. Depending on the maker and the batch of wood, the dying process had varied success. We do see some grips today that can look brown. This is due to the dye not taking well and or the way the dagger was stored. Typically early daggers tended to have softer lines than the RZM types indicating more time and care had been taken in finishing. Original handles were never made of anything other than wood. A plastic handle is a dead giveaway of a fake. The wood on SS daggers is notorious for chipping.

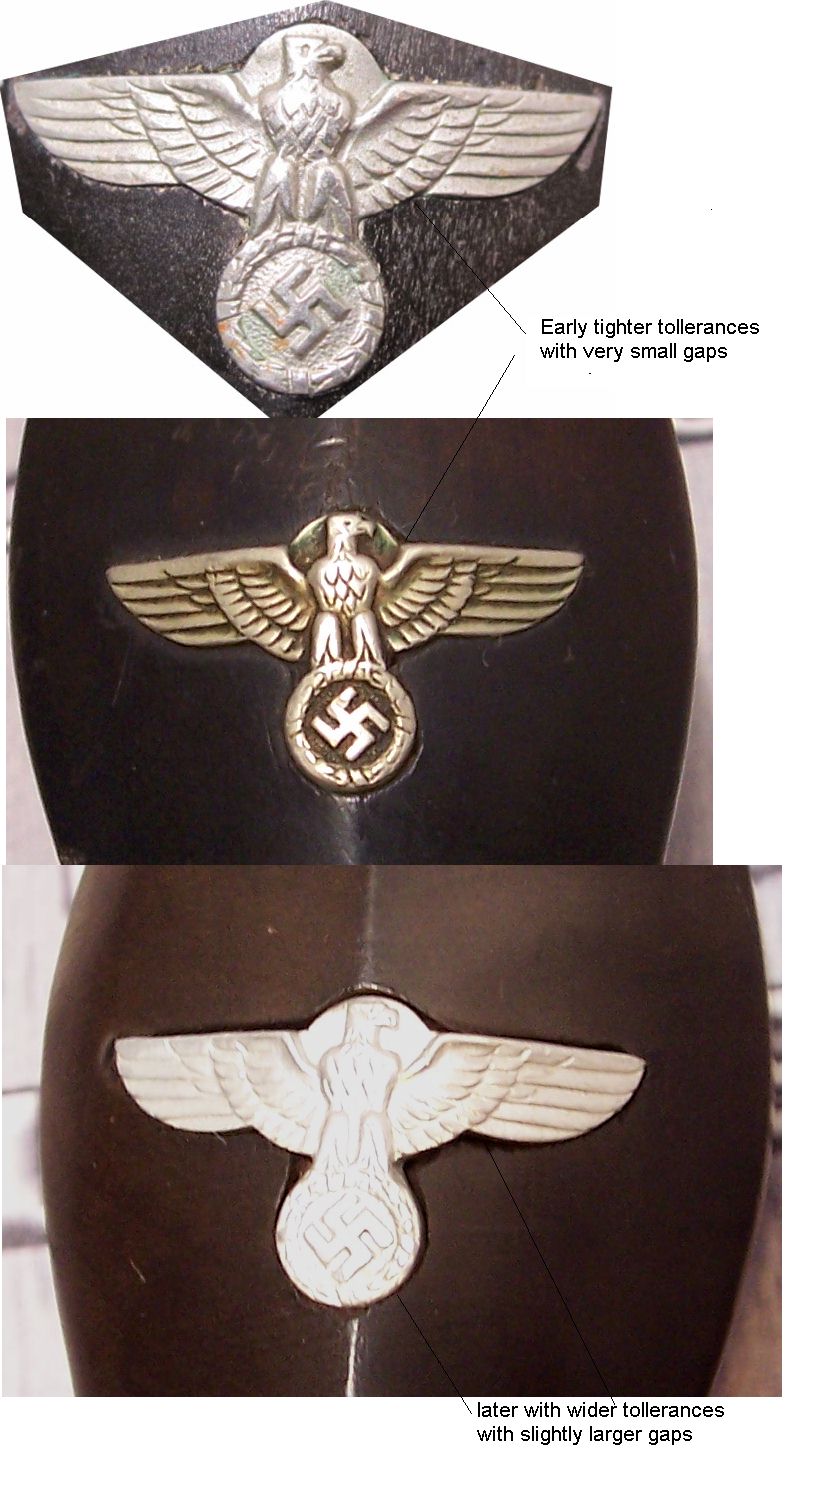
Eagle
Eagles are centrally placed in the grip and normally at the widest point of the grip. These eagles were very well fit with very little clearances between the wood and the metal. Later daggers show greater tolerances and you can sometimes see minor gaps. You will see the odd dagger that has been de-nazified. This was often done by digging at the eagle with a sharp instrument. Evidence of this is easy to detect. I have seen shrinking of the wood push the eagle or part of the eagle out. A wing slightly lifted out from the surface of the wood is sometimes seen and although not desirable can happen. By the way, don't worry, the inlays are pinned in-place and don't fall out easily. Just look closely at the eagle. You will often see wear in the high areas, this is a good indication that it has not been replaced. In use, the wearer often held the dagger from moving as can be seen from many period photos. RZM daggers had nickel, aluminum, zinc or plated eagles. Sometimes these eagles have oxidized and look to have powder on them. Others appear to be copper colored as the plating has gone completely leaving just the copper flash coat visible. Less care was taken with these later daggers and as a result some may appear to have less than perfectly fit eagles.
Roundel
Roundels or insignias vary only slightly from dagger to dagger. I have seen the hue vary from bright silver to a copper however they are all exactly 9mm in diameter. Sometimes the exposed enamel on these will flake off or darken so look close. Roundels were made with care and even the latest vintage piece with have a well-made enameled roundel. These roundels will be smooth and convex with evenly shaped runes. Individual makers would buy their eagles and roundels from preferred suppliers and as a result we can know what sort of eagle or roundel to expect when buying. This can provide a clue to authenticity.
SCABBARD
There are 2 common types of scabbards:
- Anodized
- Painted
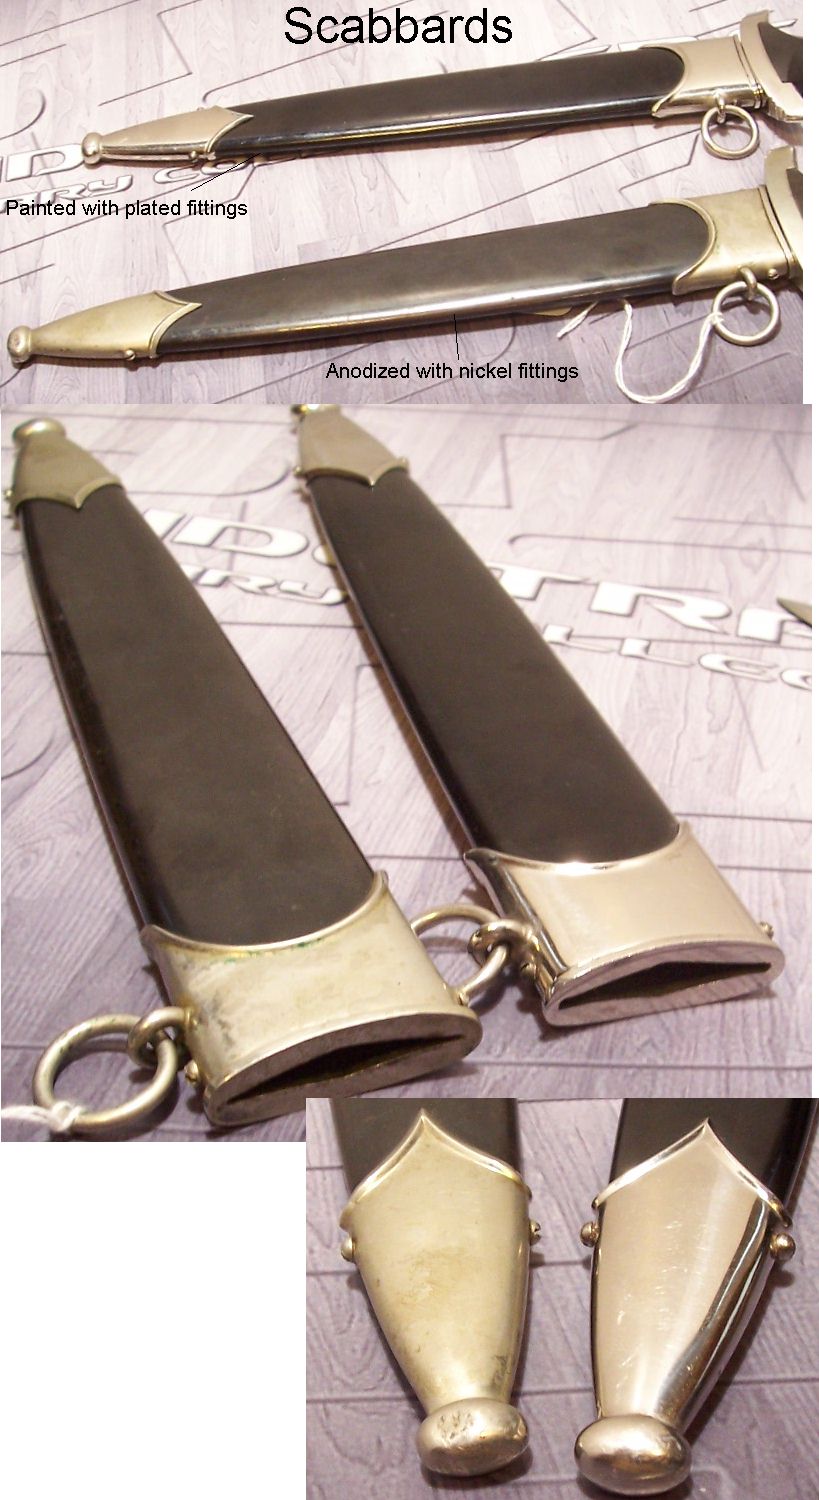
The earliest most desirable examples are anodized. Again these early scabbards are the most desired by collectors. Anodized scabbards exhibit the best workmanship. BTW, I say anodized but truly the scabbard steel was blued, similar to the way guns are blued, and then lacquered. I say anodized because that is the common jargon used in the hobby. They always came with solid nickel fittings. Nickel fittings are softer than steel and the balls are very susceptible to bruising, so much so that fining a perfect nickel ball is near impossible. Over the anodizing was lacquer. This lacquer often wears off and sometimes loose flakes can be rubbed off even with a soft cloth. Where the lacquer remains you have a shiny finish and where only anodizing exists, it dulls to a matte finish. Many anodized scabbards have lost all their original lacquer finish. As the anodizing wears off, you may see right down to bare metal or rust.
The painted scabbard was adopted after the anodized scabbards, I suspect to speed and simplify manufacturing. The first made used up solid nickel fittings and very soon adopted the plated fittings. Typically the paint was evenly and professionally applied. After drying the scabbard was assembled. This involved inserting a lead weight into the bottom of the scabbard, then assembling the throat with spring runners and the exterior fittings. Guys take your time when checking scabbards. If the fittings are nickel that means all the fittings are non-magnetic, so check them with a magnet. That means the ball, the upper fitting, the ring and the throat. All these parts should exhibit the same material, even wear and patina. Same thing for a scabbard with plated fittings all parts should be magnetic. As with the earlier type scabbards, paint wore and chipped off from wear and in some cases the paint is worn down resulting in rust and corrosion. Look closely at the item, dents scratches and splits in the ball all depreciate value. Missing and or buggered screws can be an indication the scabbard was messed with. By buggered screws I mean screws that have the heads messed up normally because someone used the wrong screwdriver. I always look at the edges of the scabbard fittings. Marks there can indicate that someone has removed the fitting from the shell, often to the detriment of the dagger. Finally, remove the blade and shake the scabbard, is the lead weight loose? Disassemblers have messed up more daggers than I care to think about. Again the scabbard fitting material should be consistent with the crossguard and nut material. If you see mismatched hues from the scabbard to the dagger, look more closely, this may be evidence of switched parts. Below are examples of anodized and painted scabbards.
FITS
To most experienced collectors this stuff is obvious, but to me when I was a beginner, I had to learn this from scratch. These lessons literally cost me thousands of dollars. What I have to say is to the best of my knowledge. There are exceptions to every rule and every piece you buy has to be evaluated on its' own merit. Most of what I have to say deals with purchasing daggers online. Hopefully this can be a starting place for the beginner.
Handle to Crossguard Fits
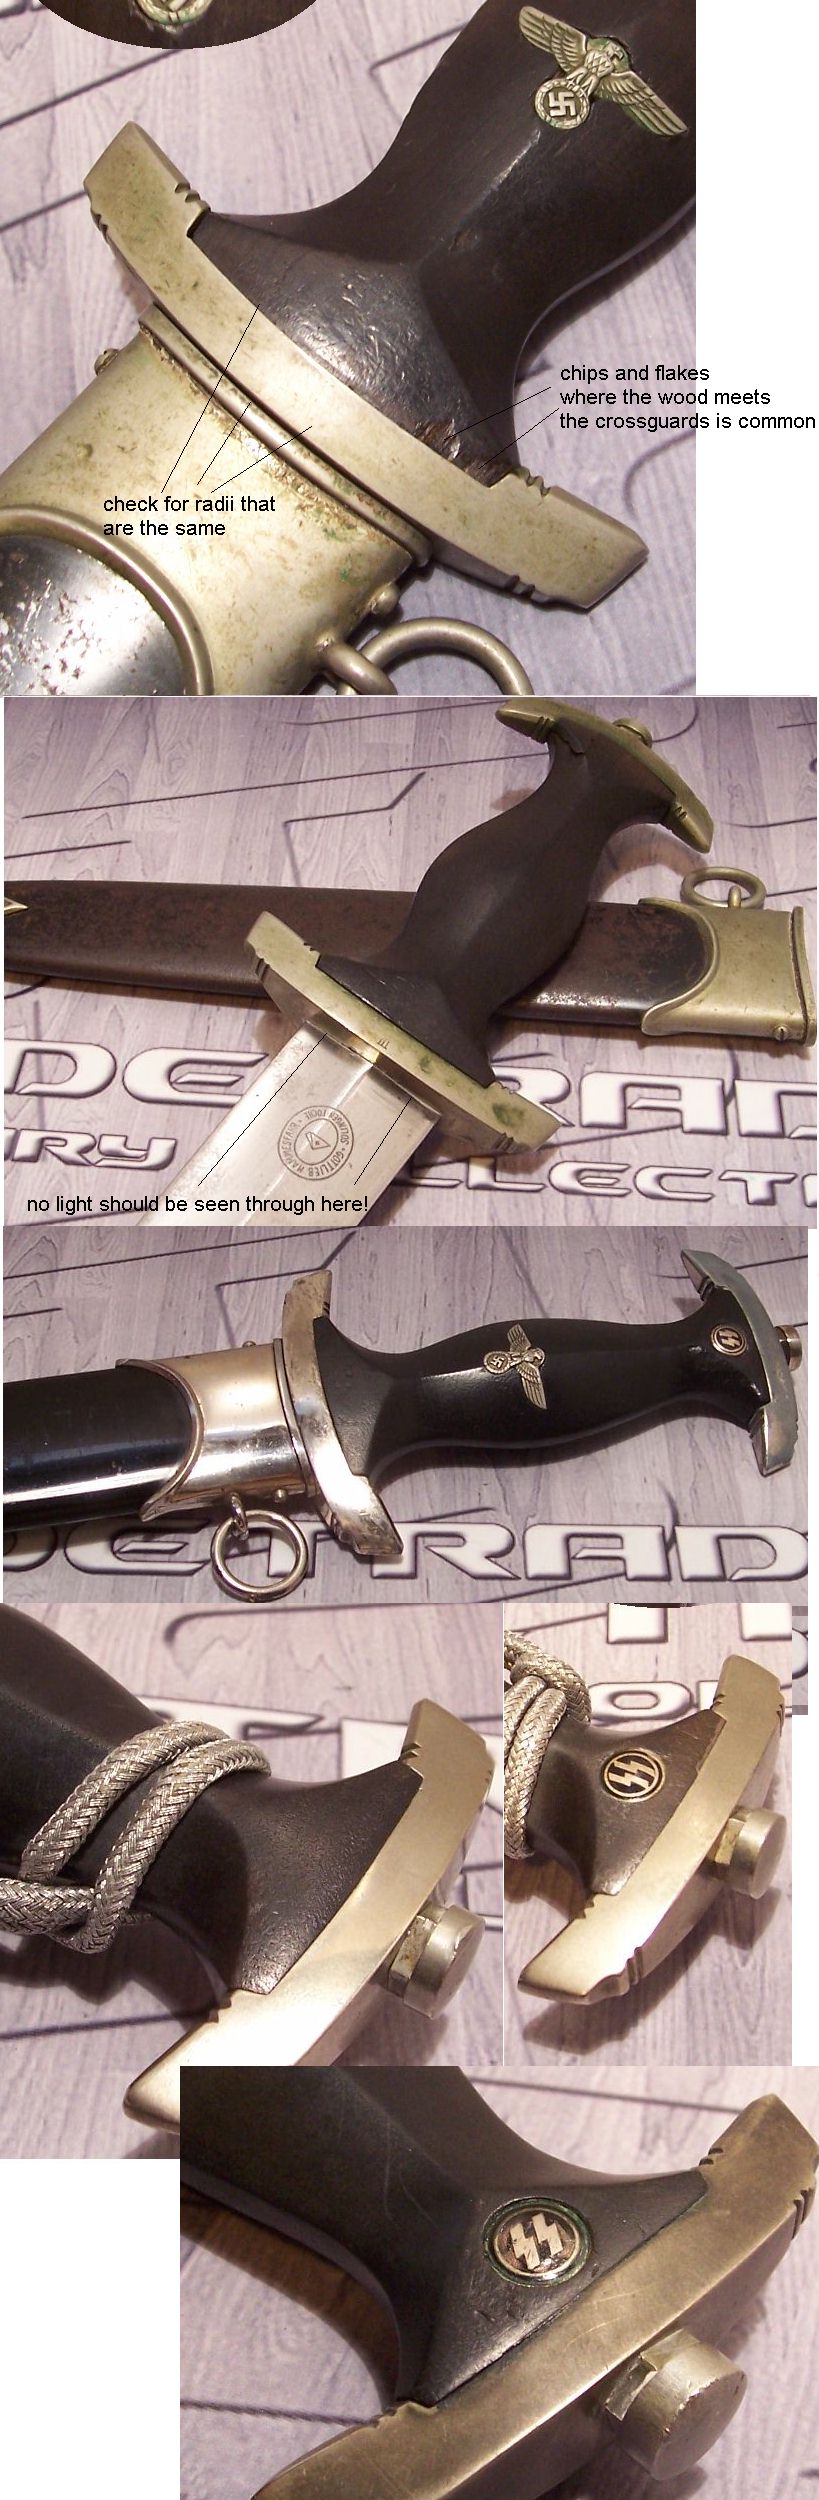
Whenever 2 materials are brought together there is natural movement as a result of exposure to time, air, humidity and temperature cycles. Wood tends to shrink over time as compared to metal, which is stable. As a result we see the grips' ends shrinking away from the tips of the crossguard. The wood tends to shrink more with the grain than against the grain. As a result you will often see small gaps (up to 2mm) where the tips of the handle once met the ends of the crossguards. Closer fits are desirable. Gaps of more than 2mm should cause you to look more closely at the dagger. Typically the shrinkage is uniform from side to side so a gap of .5mm on one side and a gap of 2mm on the other side should be a red flag. Variable shrinkage could be caused by a change in the wood grain however the shrinkage typically will not vary by more than 25%. Look closely at any patina between the grip and the guards. Untouched patina is a great indicator a dagger is original and just another reason why not to clean and disassemble your daggers.
Eagle and Roundel Fits
Look closely at the fits. I look to see that the wood surrounding the inlays is smooth. Cracks often have developed over time that run lengthwise perhaps from the roundel up, or at the ends of the eagle. Although not desirable, these are the natural result of time and improper protection against humidity and temperature cycling. Red flags would be chipping around the inlays consistent with someone removing them. These inlays are almost impossible to remove without damaging the adjacent wood. The harder and closer the grain the more susceptible to chipping. Again later RZM daggers had more tolerance than early daggers around the eagles.
Crossguard to Blade Fits
Again look for a close fit. Seeing light or obvious gaps between the blade and the crossguard is a sign to look closer. Again, I look for patina that is in this area. This can be a sign that the dagger blade is original to the crossguards. As a note, I particularly look at this fit in early maker marked daggers. RZM daggers will often display less than perfect fits. A poorly fit blade is a red flag. Unfortunately, the blade is the area most susceptible to "trick" photography. The blade can look dramatically different depending on its' angle to the camera. Always look for shots that are straight on to the blade. Angle shots and shots looking down the blade always portray a darker than actual motto. The below photos demonstrate how the same blade can look very different. A good test when buying a dagger is to hold the bagger up to the sun and look for gaps between the blade shoulders and the crossguard. You should not see light coming between these two areas. Sometimes you will see pictures of daggers completely disassembled. I really hate seeing this and 99% of the time I pass on these pieces. Sellers who take apart daggers are often inexperienced and trying too hard to prove it's real. Even if there is no visible damage reassembly often results in chips or cracks down the road. People tend to reef on the nut and the result is chips and cracks as the wood moves over time. If the dagger is disassembled look for billet marks, (small lines up either side of the tang where the blade was squeezed while working it) they should always be present. Buffer pads are small pieces of cloth or leather that are sometimes cut to the oval shape of the scabbard and put between the blade and the lower crossguard. These are another red flag. They tend to cover up poor fits and were rarely were used on period SA's or SS daggers.
Scabbard to Crossguard Fit
Look closely at the fit of the crossguard to the top or the scabbard. The patina should match. The radii should be the same. If you see larger gaps on the ends than in the center or vise-versa, be suspicious. The space between the 2 components should remain consistent. Pictures on left demonstrate a good fit and on right evidence of a parts dagger.
EXCLAMATION MARKED SS DAGGERS
Exclamation Marked daggers these have the motto, "Meine Ehre heisst Treue!" with an exclamation point. These have been a subject debated among collectors for years. Some believe they are special presented pieces or awards for certain achievements. I do not believe we have a conclusive argument at this point as to their purpose. I can share with you a few things about their construction though. These were only made by the following maker marks Klittemann & Moog and Jacobs. These producers also made daggers using the following RZM marks, 7/29, 324/37 and 324/38. The RZM marked daggers always used early quality nickel fittings and painted scabbards.

MODEL M36
Well the chained SS or what some like to refer to as M36 dagger was authorized for wear in 1936. This dagger essentially used the M33 but added a chain to the scabbard. In some cases we see a maker marked dagger in a M36 scabbard. This might be the result of frugal owners purchasing just the new scabbard and replacing their M33 scabbards with the new one. In other cases the daggers were "upgraded" later by returning Veterans, collectors or dealers. The most desired configuration today is an M36 as it left the factory. All M36 daggers left the factory assembled with unmarked blades. What I mean by that is with just a motto on the blade, no maker mark or RZM markings, the reverse of the blade is blank. The crossguards were unmarked. So for the remainder of this discussion I will only address the chain. Two types of chain were made Type I and Type II. Both types were produced concurrently.
Type I
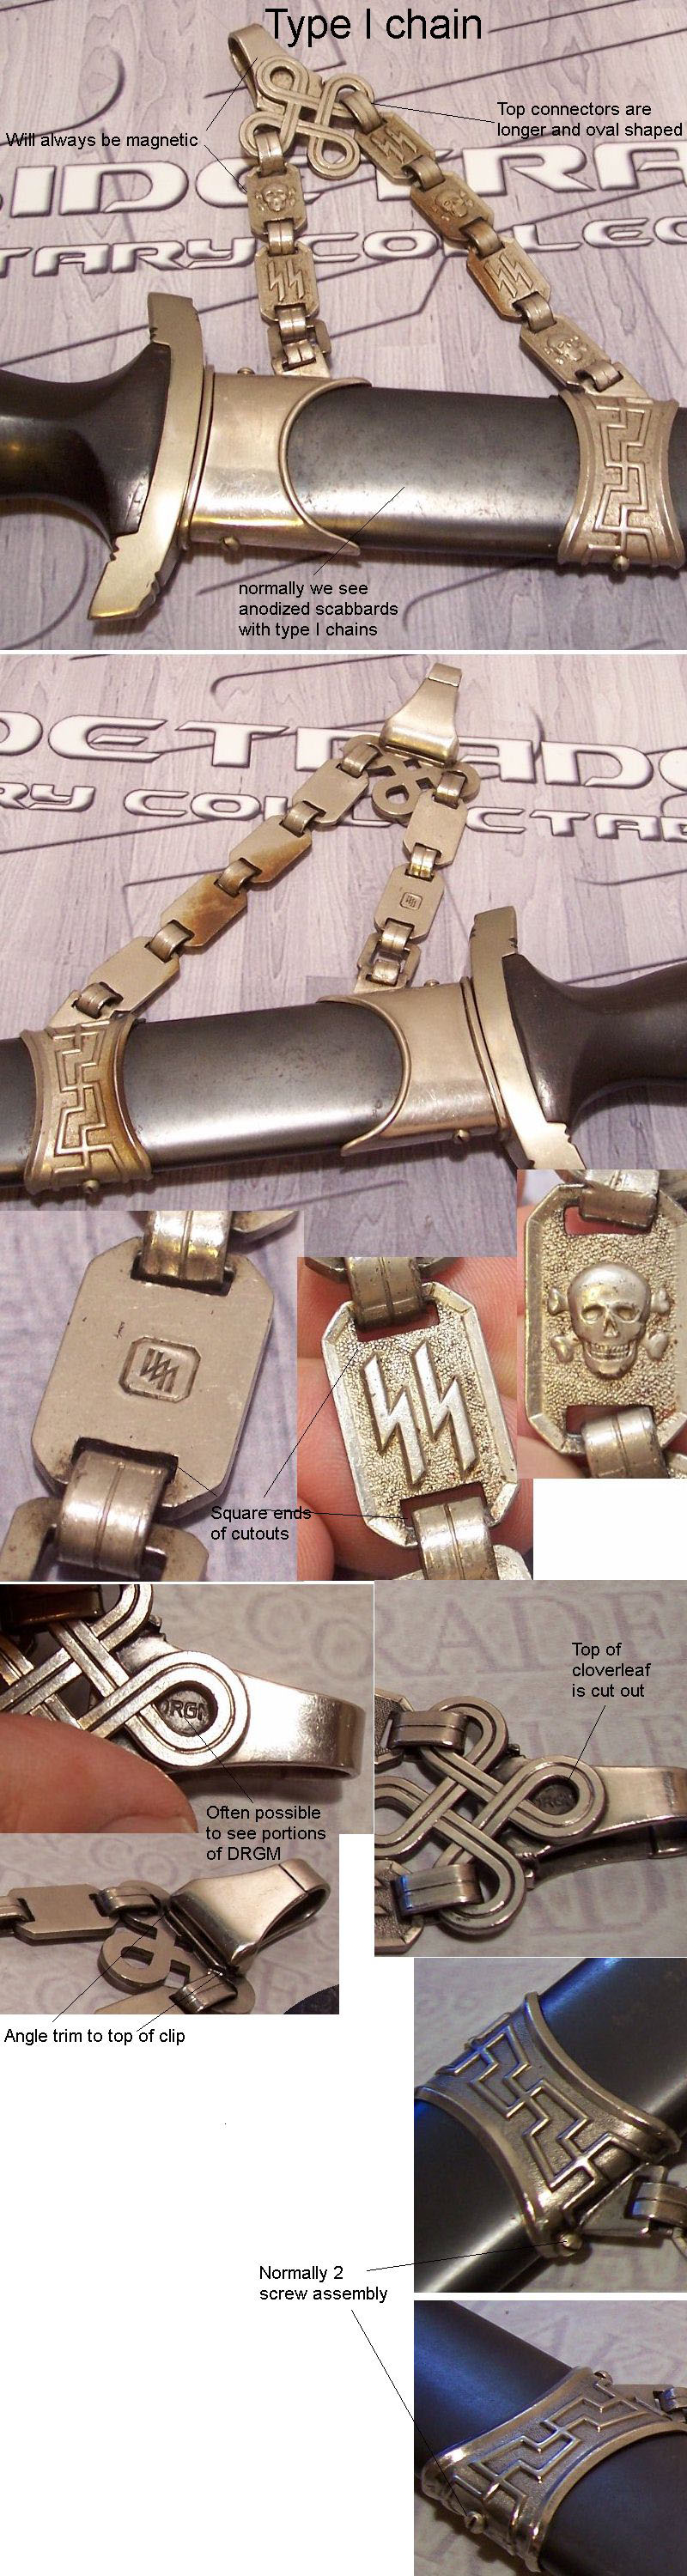
These chains are most easily discussed as they varied very little. The chains are always magnetic. They always utilize die stamped links with square orifices. These links exhibit alternating sigrunes and skull & crossbones with pebbled backgrounds. They always exhibit high detail however normally they do not have any burnish to the backgrounds. The upper chain has two links with a square spacer next to the scabbard body. The link next to the spacer has a centrally placed deep SS stamp to the reverse. The links are tied together using round connectors with a decorative center line. The lower uses 4 links. The chain comes together at the top with a clover leaf snap clip assembly. The link connecting the chain to the clover leaf used an oval shaped connector that appears longer. This cloverleaf is made from two pieces. A standard clip with the cloverleaf soldered to it. Often if you peer through the top hole you can see portions of "DRGM" in the clip underneath. I have provided detailed pictures below of an original example. Take careful note of the shape and length of this clip. The chain assembly is secured to the scabbard using small piece of plated steel which were soldered at the correct angle to the top fitting and the center band. The center band is normally assembled to the scabbard body using two screws. Normally Type I chains are assembled to anodized scabbards. These type chains often exhibit oxidizing and plating loss.
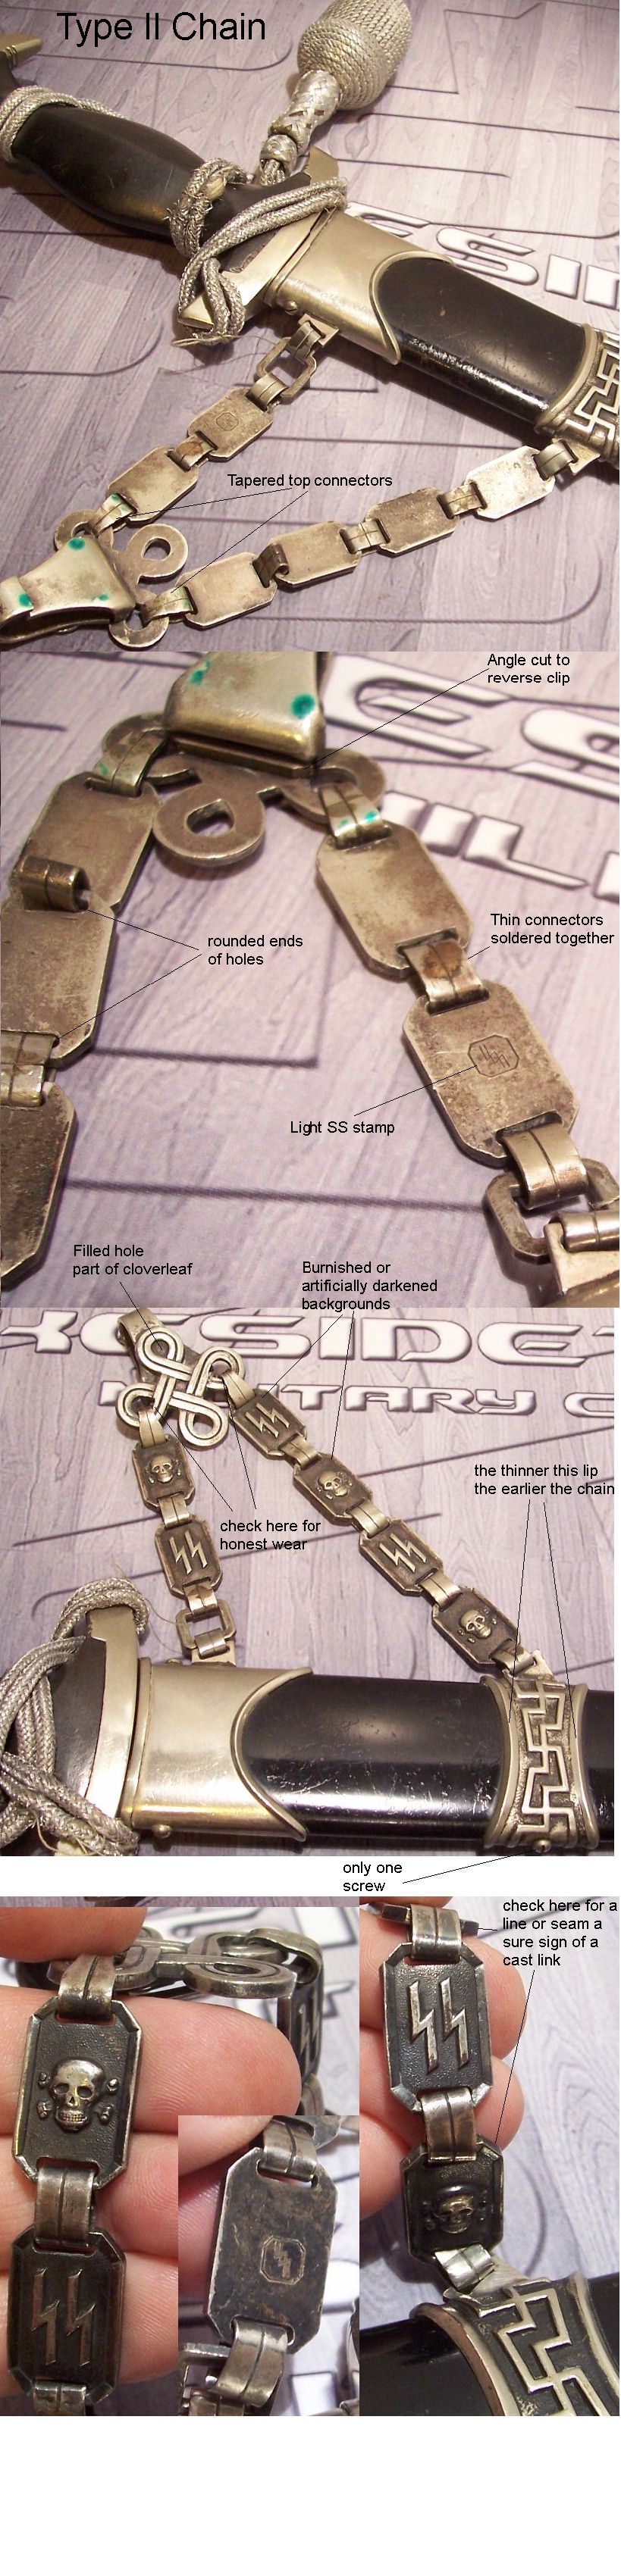
Type II
These chains were initially produced in nickel and later production was switched to steel. The early chain will be solid nickel to include the clip, (with the exception of the internal spring), center mount and all links and connectors. Nickel is nonmagnetic. Later chains will be steel based. You will get one or the other. Be very leery of chains with mixed materials. If the chain is magnetic it should all be magnetic. The links always have burnished backgrounds highlighting the alternating sig runes and skull & crossbones. They always utilize die stamped links with rectangular holes with rounded corners. These links exhibit alternating runes and skull & crossbones with pebbled backgrounds. They always exhibit high details, with some wear to the nickel chains. The upper chain has two links with a square spacer next to the scabbard body. The link next to the spacer has a centrally placed light SS stamp to the reverse. The links are tied together using thin soldered metal connectors with a decorative center line. These connectors were notoriously weak and often broke or were twisted in wear. Period repairs to them are sometimes encountered. The lower uses 4 links. The chain comes together at the top with a clover leaf snap clip assembly. The links connecting the chain to the clover leaf used tapered connectors. Note the shape and size of this connector. Often fakers get this wrong. This cloverleaf clip assembly is made from two pieces. A standard clip with the cloverleaf soldered to it. This cloverleaf differs from the type I as the top hole is solid and not cut out so you can never see the clip through it. Again I have provided detailed pictures below of an original example. Take careful note of the shape and length of this clip. The chain assembly is secured to the scabbard using small piece of plated steel which were soldered at the correct angle to the top fitting and the center band. The center band is normally assembled to the scabbard body using a single screw. Early Type II chains are assembled to painted scabbards. Later anodized scabbards were used and these were assembled using two screws at the center band. As production went on the edges of the center scabbard band grew. Early center bands have very thin edges and later examples will have thicker edges.
Gau Stamps
Gau stamped Crossguards. We do find examples of chained SS daggers with Gau stamped nickel crossguards. These have been a mystery yet to be answered as to what the reason was for these. To this day many discussions have surrounded these. What we do know is that these daggers always have matching nickel crossguards and eagle nickel eagles. They are most often encountered with Type I scabbards. The collecting community and all reputable dealers have come to accept these as a completely correct period variation.
SIGNS OF AUTHENTICITY
Hanging Test:
Look at the dagger hanging from the scabbard ring/clip. It should hang at the correct angle approximately 45 degrees. If the angle looks wrong the scabbard could have been replaced or the lead weight could be missing.
Wear Test:
All wear should be consistent. If the handle is all banged up and the scabbard mint likely the scabbards is not original to the piece. The only exception I've seen to this is a mint blade on an otherwise worn dagger. Perhaps the owner never removed the blade. In the case I'm thinking about, the Vet who left his dagger in and attic for 40 years deteriorating the exterior while leaving the sheathed blade protected from the ravages of time. All I'm saying is that inconsistent wear is a sign to look closer.
Spotting Chained Fakes:
A couple things to be on guard against: One, the links should not have a seam on the edges. This is a telltale sign to casting and links were never cast. The links should have perfectly flat backs, there should not be wee holes or imperfections from casting. Look at the shape of the clips I have provided pictures of. Some modern repro's now have elongated clips. Finally look at the back of the clips, these were trimmed on 45 degree angles, fakers missed this detail, (till now that I told them ?). Only now look at where the chain links rubbed against the connectors. These areas are key. Do they exhibit honest wear? Now I'm telling you these details but while you are reading it so is some guy in China who's whole income is made from perfecting fakes. So every mistake they make only makes a stronger case to buy this stuff from a Certified dealer.
BUY THE CORRECT CONFIGURATION
Original daggers should have the correct configuration. In general look for the following:
- Early Daggers (including early RZM contract daggers): Anodized scabbards nickel fittings and crossguards district stamps Highest quality. . Early contract dagger makers are 120/34, 121/34 and 188/35.
- Transitional Pieces: Anodized or painted scabbards nickel or plated fittings and crossguards (but they should be consistent and not mismatched).
- Good Quality RZM pieces: Plated or Steel crossguards-less frequently nickel. Nickel, pot metal or aluminum eagles. Painted scabbards. Poorer fits.
INTERNET PURCHASES
Commercial Terms
Buying from reputable sources on the internet provides lots of time to study your purchase and check it out well before committing so is preferable in many ways to shows. Auctions sites however have inherent risk. You don't know the person; there is no relationship. The only basis you have to complete a sale is a Web Site, User ID, or an email address. I have completed many thousands of online transactions and here are a few do's and don'ts. Yes, you will miss out on the odd deal but in general following these guidelines will save you grief.
Do's:
- Start collecting by purchasing from certified dealers who are reputable and honest.
- Attempt to use an online payment service that allow charge-backs. Paypal allows you to charge-back the seller in the case of non-receipt. A MO is only slightly safer than sending cash
- Ask for an inspection period.
- Check feedback from other auctions, if questionable, check with the other party to see if the issue was resolved, but keep in mind that there are always transactions that go bad, even for the best of sellers.
- Proceed very cautiously if you get offers to purchase "outside the auction site".
- Ask for more pictures.
- Search the collector forums with the seller's name, often problem sellers have a history.
- Post on the collector forums if you have questions. Other collectors are your best source of info (polite questions from beginners are always answered).
- Ask a collector moderator to help you out if you run into transactional problems. Never underestimate the power of these forums.
- Ask for a respected person to inspect the item or act as an escrow agent for large transactions if you are not sure (Be sure to pay them for their services).
- Treat your seller respectfully and honestly. Relationships are required to build a truly great collection.
Dont's:
- Bid on "Private Auctions" -often it's the seller who's hiding something.
- Jump on a ridiculously low "Buy it Now" price. -Look before you leap.
- Purchase from former east block countries. Save yourself a lot of heartache. If you, do insist on an escrow service!
- Don't pretend you know it all, there are few absolutes in our hobby and even seasoned collectors are occasionally surprised.
Ok, I'm ready to buy an SS Dagger!